Thursday, March 10, 2011

It's officially, official. The kitchen is done!

Strike up the band and break out the balloons! After a few years of brainstorms and daydreams, months of planning, weeks of dust... we have a new, usable kitchen. It's pretty exciting, and we're lucky to be able to pull this project off.

The former kitchen was not in great shape- peeling laminate cabinets and counter top, greasy stains [everywhere], perma-grime on every surface, a leaking portable dishwasher, a very deep refrigerator... Oh yea, and "bruised avocado green" walls. Ultimately, most of the kitchen was too gross to even use. It had to go.

Demolition was a beyond cathartic:


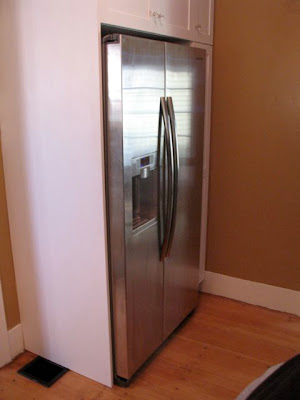
The old floor plan was not ideal. An over-sized refrigerator, in a kitchen not built with such an appliance in mind, took up a lot of space, visually, and interrupted movement within the room.

The old floor plan:

The old cabinet configuration only had about nine inches between the counter and the upper cabinets. This made most of the counter space useless for anything, but may storing some cans or baskets.

We acted as our own designers, and took time to make what seemed like minor decisions. After the floor plan was determined, and the cabinet style and appliance finish agreed upon, I surrendered creative decision making power. Project planning sped ahead, and before you knew it, labor was under way.

Reversing the position of the range and refrigerator has opened up space, visually, and consolidated the work zone. Technically, we lost counter space, by eliminating the portable dishwasher. But because the counter is more accessible, with 18 inches from counter to upper cabinets, we can use everything we have, which gives us much more usable space. Win!

The new floor plan:
The old corner base cabinet was a waste- it was too deep to reach in to clean, and went unused. The addition of the Lazy Susan has made this corner very useful.

Corner base cabinet, before (note the flooring and gross old cookie cutters, found inside):

After:

Replacing the counter top is always a big ticket improvement, in a kitchen remodel. We weighed our options and are pretty pleased with the improvement.

Faux slate laminate and plain tile:

This solid surface counter top and mosaic tile put the "splash" into backsplash:

Yes, I did just make that joke. And not only because I'm very sleepy- that really is just my sense of humor.

Previously, there was one light in the kitchen. We replaced the fixture, then added two pendants above the sink. The microhood light illuminates the range, as well.

The new lighting:
So, let's take a look at the whole thing, already! It was not until preparing this blog update that I realized we are without many "before" photos. The best I have are these views from the dining room:

Before:

After:


In another post, we'll have more information about adventures in purchasing appliances, fixtures and cabinets.

In writing this post, I feel that I've relived this whole process. Just like in real-time, it's exhausting, but rewarding! Stick a fork in it- this kitchen is DONE!

Monday, March 7, 2011

Almost Done

We are almost there!

The schedule indicated we would be done YESTERDAY, but there are still a few small things to wrap up- caulking, a few pieces of a trim and switch plates. THEN we will officially close this chapter of home improvement.

We are excited to show you the fruits of our labor [and the hard work of family and friends, incuding our contractors and vendors]. Please keep checking the blog this week for the final installment of the kitchen renovation.

Until then, have a look at what we did on Sunday:


Wednesday, March 2, 2011

How We Installed a Blind

For a window treatment in the kitchen, we knew we wanted a blind, and I definitely wanted to mount it inside the frame- but that window is shallow, with only enough room for a one-inch blind.

Luckily, we found two stores, online, that carried the one-inch wood blinds: Select Blinds and Just Blinds. The websites are nearly identical- and so are the color selections. We ordered the [free] samples, and chose "Almost White," which is a near perfect match to our trim and cabinet color.

While both stores have great reviews, SB had a slightly lower bottom line. We also ordered the blinds we will use in the office and media room.

If you have ever removed blinds, you know how easy it is. Hanging them is just as easy- it is the same process, in reverse.

Here is a photo of the hardware. Installation is very straight forward and only requires a few tools- a drill, level, pencil and screw driver. For a window with a third bracket, I would have need a measuring tape, as well.

Position the brackets (double check your placement!)...
... and mark the wholes with a pencil. Make sure to hang the brackets on level, so your blind won't warp or strain. (Oops- I marked the wrong spot! You'll see in the next picture, I corrected this before I hung the blind, to get it closer to the window.)

Pre-drill, the drive the screws through the bracket:

Slide the blind into the brackets, making sure the pulley/tilt rod are on the outside.
Snap the brackets closed, to secure the blind in place:

Attach the white, plastic R-clips to the header, and clip the header onto the blind:


Double check function, and level. You are ready to enjoy light-filtering privacy!

What are the cons?

The string is a little long. When the blind is open, it lays on the counter and could fall in the sink. Fortunately, the blind will likely be closed most of the time, for privacy, so it won't be an issue.

Also, the blind makes contact with the window. This is not a big problem, but I would like it to hang freely.
What do you think? Do you have blinds? Any hilarious got-myself-stuck-in-the-blind-cord stories? Do tell!

Tuesday, March 1, 2011

Spray Painting Lamps: Before and After

DIY inspiration struck again.

In a quest to graduate from furniture and accessories left over form our college years, I've been hungrily searching for lamps to replace these:

Collectively, I think I spent about $20 for both lamps and the missing shade. Please note: these lamps look better in this picture than in person.

When I have to shop for something, for the first time, I find that I lack any opinion and end up spending months pre-shopping before I feel prepared to purchase. Drapes? Shopped for about 22 months. Rugs? 6 months. Dishes? HA!

With visions of what the current-TV-room/future-office will look like in a few months (after removing wallpaper and repainting), I started getting excited, and feeling inspired. I wanted dark lamps with a clean, casual look.

The lamps pictured above were destined for the "donate" pile, as I started pre-shopping. I was looking for a dark base (to match the drapery rods I picked) and mica shade- in bloth a floor lamp and a table lamp. Most of what I found came in around $40 per lamp- ouch.

At Target, I was inspired to check out the lamps and shades that could be mixed and matched. This shade caught my eye:
I realized that I might be able to add new shades to my old lamps. Two shades were around $35 together (one large, and one medium). I couldn't find the exact shades on the Target website, but they are from Target's "Home" line.

At home, I found the shades did not fit *perfectly* on the lamps, and wobbled a bit. I made shims by wrapping strips of foil around the base of the shade, for a better fit:

A quick sanding, a few coats of spray paint, and the lamps were ready for their new shades. The brown spray paint did not come out as dark as I wanted, so I may repaint them, later. But for now:

Doesn't the little lamp remind you a child wearing a big hat? Not the most amazing lamps I've ever seen, but they will work for now. If I replace them, later, I will probably keep these shades, though.

Revisiting Janet's Table

You may remember this post about Janet's Table from November 2009. In that post you can see that we wrapped the table legs with newspaper. The legs were originally finished with casters, which have long since gone missing. As a result, the table was a bit short and forced diners to shove their knees under the table.

We didn't want to scrape our knees on the table, and didn't really want to replace the casters. So, for Christmas 2009 I asked for bun feet. Walt made some sweet little bun feet, which were finished many months before we actually installed them. For Christmas 2010, we installed them. It wasn't too complicated:

Tear out the old hardware:

Install new hardware, screw the bun feet into the legs, add some felt pads:

And voila!

The table is much more usable, now and as soon as we get it cleaned off we look forward to using it on a regular basis.