Monday, March 28, 2011

2011 Forecast

In October 2010, this post described our progress, relating to a list posted earlier in the year (here: 2010 Forecast). We had barely touched the list! Our good intentions meant very little once the home improvement ball was rolling.

Last summer, the City sent us, along with our neighbors, a letter explaining the City's plan to replace our sewer. Good news, right? Did I mention that replacing our fully functional sewer connection will be at our cost? It isn't how we'd hoped to spend that chunk of money, but there is no way around it, so we have to bite the bullet.

This impacted our 2010 list, and will also play into our 2011 list. We can't very well build a retaining wall when it might be damaged by work in the street, and possibly in our yard. So that project has been simmering on the back burner, for a while. I just said simmering, didn't I? More like ice cold. Bummer.

Fortunately, the NE Portland Bungalow still has plenty of home improvement projects to chose from. Here is our pipe dream proposed "To Do" list for the remaining three quarters of 2011:

1.) The exterior:
-remove the poured concrete patio/sidewalk and replace with pavers
-fix the gutters and dig french drains
-prune the out of control fig tree
-remove old plants, till/level the yard, and replant grass
-build a shed for the grill, mower and other lawn care tools

The backyard has seen (and will see) better days:

Here's a peak at the monster fig tree:

There is a lot to say about this tree, and it could have an entire post just for itself. Maybe it will someday.

2.) The current TV room:
-remove wall paper, strip paint, repaint
-repair plaster
-remove door to bathroom and frame in wall instead

The current TV room:

The room is currently egg-salad-yellow paint over wallpaper, has about 5 layers of paint on trim, and has plenty of damaged plaster (not to mention holes in the plaster from insulating the room). This project should be very similar to the dining room project, and will hopefully go much faster.

(at this point, we'll play Musical Rooms, moving our bed to that room)

3.) The current bedroom:
-repair plaster (no wallpaper- woohoo!!)
-strip paint, repaint
-restore sash windows

The current bedroom:

This picture was taken during the insulation project, in November 2009. Clearly, this room will need lots of plaster repair. Fortunately, there is no wall paper to strip, but there are sash windows to restore. I'm excited for that experience, but intimidated by the unknown.

4.) And everyone's favorite category, miscellaneous:
-if we're ever really feeling ambitious, strip some paint off the fire place brick

If anyone has any good tips or stories relating to french drains, restoring sash windows, landscaping or anything else, please do share- advice might be just want the doctor ordered!

Saturday, March 26, 2011

Some [Un]usual Homes in NE Portland

I was planning a post to show off some of the cool older homes currently for sale in NE Portland. Then I saw this post by Dawn, over at Bungalowcious. Did you click on the link? And did you see Baby Shutters? Isn't she great?

Northeast Portland is littered with unique and beautiful homes, and there are still many diamonds in the rough. For example...

The Double Stack:

The "What Happened Here?":
What did this poor foursquare do, to deserve such a remodel?

The Purple Monster:

The "We Saw the Purple Monster and Wanted to Take it One Step Further:"
The gold trim really adds that "pop" they talk about on HGTV.

And finally, this baby caught my eye, on my way home from work. But it is not the house that made me do a double-take. Do you see it? There, on the front porch.... Is that a paper mache dinosaur??

It sure is.

Have you seen any houses that inspire you to scratch your head, or make you feel better about the state of your own home? Hey, maybe OUR house is the one that makes you feel better about yours! Either way, I hope you enjoyed the houses, and enjoy keeping an eye out for more unusual homes.

Thursday, March 24, 2011

Talking Trash: How We Deal with Refuse and Recycling

We have become very interested in how much garbage we produce, and what becomes of it once it leaves our home. We want to handle our waste responsibly and save money while doing it.

Portland Metro contracts with Waste Management (WM) for waste and recyclable material processing. WM is an interesting company- they harvest gases released in landfills to produce energy and they sort & recycle materials that were not sorted before pick-up.

Unfortunately, garbage service is not that cheap. Weekly pick-up for one 32-gallon cart would cost us $26.75 every month. That's $321.00 a year! Use this link to find more information on pricing for 32, 65 and 90-gallon carts.
source: http://www.montereycounty.wm.com/Royal%20Oaks/Residential.asp


Before learning the WM sorts everything they collect, I was disappointed by the number of things we could NOT put in the curbside recycling bin- common items that we frequently throw away, such as plastic bags, microwaveable containers, or broken glass.

We decided to try collecting and hauling our own waste. Gross, right? And overwhelming? And it's a lot of work, too, right? Nope, not even a little.

We only keep the recyclables (which are dry) in the house- in the basement, actually. We have an unfinished basement with (roughly) 15 square feet of space below the staircase. Sometimes this sort of space can be difficult to utilize, but when you're just stacking up bags of mixed paper, plastics, etc, you can make use of every cubic inch. Honestly, it takes months to fill this space.

These bags account for roughly 85% of our refuse. What about the remaining 15%? Nasty things that might stink (like the meat packaging) might get a rinse and opportunity to dry before going into the trash. Non-stinky things, like wads of blue painters tape, chunks of broken tile, too-far-gone dog toys, and compostable cups go in the garbage bag. The previous owners left two 90-gallon carts and tw0 65-gallon carts. I don't know if we've ever actually filled the carts completely.

When it's time to make the dump run- usually when we're tired of seeing so many bags of recycling in the basement- we load up the truck and haul it off.

So now you know what we're doing, and how we got started. Do you know why we keep doing this? Recycling is FREE. The trip isn't totally free, in fact, we have to pay the flat, minimum which is $28.00, for non-sorted materials (the refuse, which will still be sorted by WM/Portland Metro staff).

When you arrive at the dump, they will weigh your vehicle and ask about your load. This is when we explain it's all sorted recycling with a few bags of garbage. The person at the gate tells us about the minimum fee, and we proceed into the facility.

People bring everything to this place!

Compost:
(Sorry for the blurry picture!)

Mixed waste:

Recycling:

Even building materials:

Do you recognize that logo? When we needed a new register grate for the kitchen, we found what we needed at The ReBuilding Center. I bet this is a convenient drop-off for lots of home owners and contractors.

The facility operates by moving the large piles onto belts, where the staff can sort through the materials. It was hard to get any good pictures [while trying to help sort the recycling] and not bother the folks who were busy working.

On the way out, they weigh your car again, and you are charged accordingly. We are always under the first weight (400 pounds) and because most of ours is recycling, we always pay just $28.

I've been teased for the extent we go to, for the sake of saving some cash, but it's really no sweat. We have the space in the unfinished basement, we have the truck, and we're willing. It's about 90-minutes of work, every few months. We made a generous estimate that we spent $100 on refuse and recycling this year. Am I willing to do that to save $221 a year? Um, yes, of course I am.

Wednesday, March 23, 2011

Another Cool Wall Mounted Faucet

I can't tell you how much I like the wall mounted faucets. Paired with an under-mount sink and a solid surface counter top, cleaning is a SNAP.

In case anyone is shopping for faucets right now, I wanted to share this faucet by Kohler:


Kohler's website describes this faucet as being for a utility sink, but I am picturing this faucet at a kitchen sink. I think it looks a bit more modern than the American Standard Amarilis faucet we have, but I might keep my eye on this faucet, for future reference.

Wednesday, March 16, 2011

The Kitchen Details (This Post is Longer Than I Planned)

We are still riding high on the New Kitchen Express, and really enjoy cooking our own meals- even if we did promise to start eating [much] better with the completion of the project. I'm confident my waistline and our equity are already better for it.

Diving into the kitchen renovation was exciting and overwhelming. So much to do and no idea as to where to start? While we wandered blindly at first, things slowly started taking shape and we gained some momentum.

In mid-December, we demo'd the old kitchen, and refinished the floor. WHAT a RUSH! We moved the gas line and installed ventilation. New cabinets, new lighting, paint, counter top, appliances, backsplash and voila: in just under 3 months, we had a new kitchen!

All of the lighting came from Rejuvenation. We replaced the existing center light fixture with the Thurman fixture and 12" Schoolhouse shade. Over the sink we installed Dana fixtures withBell shades. There was a bit of a snag with the Dana fixtures, but the exchange was easy. We also had a scare with the ceiling fixture, but the cabinet above the refrigerator just barely missed making contact with the shade- phew!

If you read the kitchen reveal post, you might remember that I surrendered creative decision making over. It was while we were counter top shopping. I was the sticking point. We were not impressed by the selection of natural stone slabs- in fact, I would say we were quite disappointed. We settled on Corian. It was easy to order (I think...) , installed quickly and thecolor is perfect.

Oh, and that tile? It's discontinued, and I can't find it on the Internet. But it's exists. Browns, tans and creams in glass and a travertine-like material. I'm sorry I can't find more information!

We chose a 30" single bowl Kraus sink. It is 10" deep, made of 16-gauge stainless steel, and arrived with it's included grate (and random golf towel). The grate is nice- when you're using the sink, dishes do not sit in dirty water, and your sponge can fall in without getting saturated. Sometimes the grate needs to be moved to wash the sink or get all the scraps into the disposer. The sink can be found here.

Along with a new under mount sink, we chose a wall mounted faucet. That means we won't be cleaning that nasty seam where the fixtures meet, anytime soon. During the design phase of this project, ease of use, cleaning and maintenance has been a priority. The faucet is found here.

Before I forget, I'd like to introduce you to the Waste King 8000 TC! The disposer is BIG, and takes up a lot of room under the sink. It has received great reviews, and seems very well built. It does not need a switch- it can be wired directly to the power, because the on/off switch is triggered by the cap. When you feed scraps into the disposer, you insert the cap, with water running, and press down. By lining up the notches, the cap presses the button that turns on the disposer. Our Waste King still has a wall switch, so we have to turn it on (and off) twice. I like to think of it as a safety measure. We saved on this purchase here.

The next three appliances came from this store.

The new dishwasher also has a food grinder, and is *whisper* quiet. So far, this baby has made us very happy. It has a variety of settings, including "Sanitize," but, so far, we have only used the "Normal" setting.

Before the renovation, the kitchen depended entirely on the window for ventilation. Adding an exhaust hood was important. This micro-hood has already made us very happy. I haven't been able to find a link to this exact model, but Sears carries many Kenmore microhoods.

The range is almost identical to our old range. It has a broiler and 4 gas burners. It does not have the perma-grime stains, which is a bonus, and is 8 years younger.


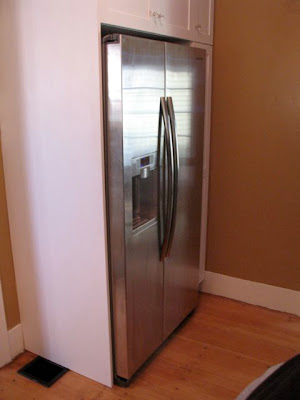
The refrigerator is pretty slick, with 24 cubic feet of counter depth food storage space. Features include "theater lighting," Multiflow cooling and it is Energy Star compliant. This last appliance was purchased at this outlet. Shopping at the outlet saved us a bundle, but we learned a couple lessons for the next time.

Finally, the feature I am most pleased with: the bulkheads! I thought they would look fine. I think they actually look great, and give the appliance an integrated feel and appearance, making them part of the kitchen, rather just something stuck at the end of the row of cabinets.

Next to the refrigerator, you can see that grate we reworked for the modified vent. That grate represents my greatest DIY victory to date.

Dare I invite feedback? Of course, like all bloggers, I get really excited about comments and treasure each of them. So... What do you think? Are you in the middle of a reno/remodel/restoration? If so, please do share a story or comment with a link to your blog so we can enjoy yours story, too!

Thursday, March 10, 2011

It's officially, official. The kitchen is done!

Strike up the band and break out the balloons! After a few years of brainstorms and daydreams, months of planning, weeks of dust... we have a new, usable kitchen. It's pretty exciting, and we're lucky to be able to pull this project off.

The former kitchen was not in great shape- peeling laminate cabinets and counter top, greasy stains [everywhere], perma-grime on every surface, a leaking portable dishwasher, a very deep refrigerator... Oh yea, and "bruised avocado green" walls. Ultimately, most of the kitchen was too gross to even use. It had to go.

Demolition was a beyond cathartic:


The old floor plan was not ideal. An over-sized refrigerator, in a kitchen not built with such an appliance in mind, took up a lot of space, visually, and interrupted movement within the room.

The old floor plan:

The old cabinet configuration only had about nine inches between the counter and the upper cabinets. This made most of the counter space useless for anything, but may storing some cans or baskets.

We acted as our own designers, and took time to make what seemed like minor decisions. After the floor plan was determined, and the cabinet style and appliance finish agreed upon, I surrendered creative decision making power. Project planning sped ahead, and before you knew it, labor was under way.

Reversing the position of the range and refrigerator has opened up space, visually, and consolidated the work zone. Technically, we lost counter space, by eliminating the portable dishwasher. But because the counter is more accessible, with 18 inches from counter to upper cabinets, we can use everything we have, which gives us much more usable space. Win!

The new floor plan:
The old corner base cabinet was a waste- it was too deep to reach in to clean, and went unused. The addition of the Lazy Susan has made this corner very useful.

Corner base cabinet, before (note the flooring and gross old cookie cutters, found inside):

After:

Replacing the counter top is always a big ticket improvement, in a kitchen remodel. We weighed our options and are pretty pleased with the improvement.

Faux slate laminate and plain tile:

This solid surface counter top and mosaic tile put the "splash" into backsplash:

Yes, I did just make that joke. And not only because I'm very sleepy- that really is just my sense of humor.

Previously, there was one light in the kitchen. We replaced the fixture, then added two pendants above the sink. The microhood light illuminates the range, as well.

The new lighting:
So, let's take a look at the whole thing, already! It was not until preparing this blog update that I realized we are without many "before" photos. The best I have are these views from the dining room:

Before:

After:


In another post, we'll have more information about adventures in purchasing appliances, fixtures and cabinets.

In writing this post, I feel that I've relived this whole process. Just like in real-time, it's exhausting, but rewarding! Stick a fork in it- this kitchen is DONE!